LibreELEC is a lightweight open source system designed to run Kodi turning your device into a powerful media center. But to keep your browsing and streaming private using a VPN is key. A VPN hides your online activity protects your data and even helps you access geo blocked content. In this guide well show you how to install a VPN on LibreELEC using a free addon so you can enjoy streaming with added privacy and security. Lets get started!
Why Use a VPN on LibreELEC?
Using a VPN on LibreELEC has some big benefits:
- Protect Your Privacy: A VPN keeps your IP address hidden so others cant track your online activity.
- Access More Content: It helps you bypass geo restrictions giving you access to more streaming options.
- Better Security: Encryption from a VPN keeps your data secure protecting you from potential threats.
- Avoid ISP Throttling: A VPN can help prevent your ISP from slowing down your connection while streaming.
If privacy security and expanded access to content are what youre after a VPN on LibreELEC is definitely worth setting up.
Getting LibreELEC Ready for VPN Installation
Before installing a VPN on LibreELEC lets make sure your system is ready to accept addons from outside sources.
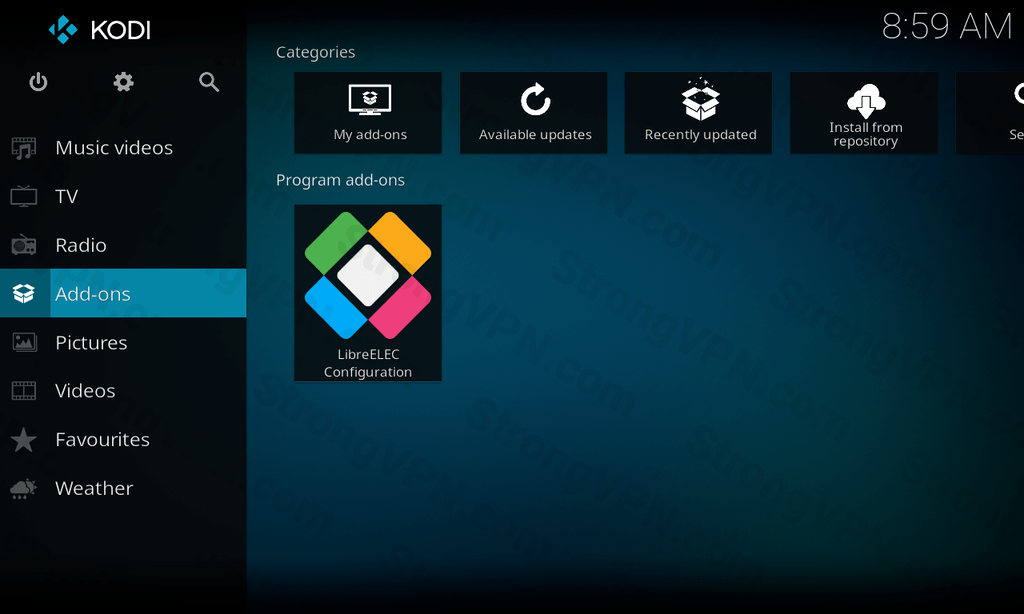
Step 1: Enable Unknown Sources on LibreELEC
- Open LibreELEC and go to Settings.
- Select System > Addons.
- Toggle on Unknown Sources and confirm by clicking Yes when prompted.
Once this is enabled were ready to move on to installing the VPN addon.
How to Install a VPN on LibreELEC Using the Free Zomboided VPN Manager Addon
Zomboided VPN Manager is one of the most popular addons for managing VPN connections on LibreELEC. It supports many VPN providers and works well with both free and paid services. Heres how to install and set it up.
Step 1: Install Zomboided VPN Manager
- Open LibreELEC and go to Addons.
- Select Install from Repository.
- Go to LibreELEC Addons > Services.
- Find Zomboided VPN Manager and click on it.
- Select Install and wait until the installation completes.
With Zomboided VPN Manager installed we can now connect it to a VPN provider.
2: Set Up VPN Manager with Your VPN Service
After installation, youll need to connect VPN Manager to your VPN provider. Many VPN services work with Zomboided so pick one thats compatible. If youre using a free VPN make sure it supports OpenVPN which is required for this addon.
- Open Zomboided VPN Manager from the Add-ons section.
- Go to Settings and choose VPN Configuration.
- Select your VPN provider from the dropdown. If its not listed choose User Defined to manually add your VPN details.
3: Enter Your VPN Login Details
- Enter your VPN username and password which are usually found in your VPN account.
- Save Settings and wait for VPN Manager to connect.
Now Zomboided VPN Manager will automatically secure your connection on LibreELEC by encrypting all traffic through the VPN.
Connecting and Disconnecting the VPN on LibreELEC
With Zomboided VPN Manager connecting or disconnecting from your VPN is simple.
To Connect:
- Open Zomboided VPN Manager from your Addons.
- Select Connect to VPN.
- If your VPN has multiple servers choose one based on your needs. For faster streaming select a server closer to you.
- Youll see a notification once youre connected.
To Disconnect:
- Go to Zomboided VPN Manager and choose Disconnect from VPN.
- This will end your VPN session and return to your original IP address.
Advanced VPN Features on LibreELEC
Zomboided VPN Manager comes with some extra features to help you get the most from your VPN on LibreELEC.
1. Enable Auto Connect
Auto-connect ensures your VPN connects every time you start LibreELEC, which is perfect if you want to stay protected by default.
- Open VPN Manager Settings.
- Under Auto Connect enable the option to automatically connect when LibreELEC starts.
- Save your settings.
2. Choose Preferred Servers
If you have multiple servers with your VPN provider, you can set VPN Manager to automatically connect to specific servers.
- In VPN Manager Settings select Servers.
- Pick your preferred servers for faster speeds or specific locations.
- Save these settings and VPN Manager will use these servers by default.
3. Set Up Split Tunneling
Split tunneling allows you to select which apps or add-ons should use the VPN. This can be handy if you only want the VPN active for certain activities.
- Go to VPN Manager Settings and select Split Tunneling.
- Choose which apps or addons should bypass the VPN.
- Save the settings.
This feature is useful if you want the VPN only for certain streaming addons helping improve speed for other tasks.
Troubleshooting VPN Issues on LibreELEC
If you run into issues with the VPN connection here are some common problems and fixes.
1. VPN Connection Keeps Dropping
If your VPN disconnects often:
- Switch Servers: Try connecting to a different server through VPN Manager.
- Check Internet Connection: Make sure your connection is stable enough for a VPN.
- Enable Auto Reconnect: Use the auto reconnect feature in VPN Manager to keep the VPN active.
2. Slow Streaming Speed
If your VPN speed seems slow:
- Choose a Nearby Server: Closer servers often provide faster speeds.
- Turn Off Split Tunneling: Disabling split tunneling might improve speed for some activities.
- Check VPN Provider Limitations: Some free VPNs have speed limits. Consider a premium plan if speed is crucial.
3. VPN Manager Not Connecting
If VPN Manager isnt connecting:
- Check Your Credentials: Make sure your VPN login details are correct.
- Update the Addon: Check for updates under Settings > Addons > Zomboided VPN Manager.
Benefits of Using a VPN on LibreELEC
Here are some perks of having a VPN on LibreELEC:
- Unblock Geo-Restricted Content: Access movies shows and addons from around the world.
- Prevent ISP Throttling: VPN encryption hides your streaming activity reducing the chance of throttling.
- Privacy Protection: A VPN hides your IP and encrypts your data making it harder for others to track you online.
Using a VPN on LibreELEC is a smart way to keep your streaming private and unrestricted.
Recommended Free VPNs for LibreELEC
While free VPNs have some limitations a few options work well with Zomboided. Here are some reliable ones:
- ProtonVPN: A trusted provider with a limited free plan and strong privacy features.
- Windscribe: Offers up to 10GB of free data each month with OpenVPN support.
- Hide.me: Provides a no logs policy and free access with limited data.
If you need more speed and data you might want to consider upgrading to a premium VPN service.
Final Tips for a Smooth VPN Experience on LibreELEC
- Choose a VPN with Multiple Servers: Having more server options can help with speed and access.
- Keep Zomboided Updated: Updates ensure compatibility with your VPN and provide the latest features.
- Restart If Needed: Restarting your device can resolve minor connection issues.
With these tips youre all set to enjoy a secure private streaming experience on LibreELEC!
Conclusion
Setting up a VPN on LibreELEC with the free Zomboided VPN Manager addon is a straightforward way to keep your streaming private and unrestricted. By following this guide youll have a VPN set up on LibreELEC in no time allowing you to enjoy content with peace of mind.
Now youre ready to dive into the world of secure streaming. Enjoy!